Qr code workshop.
Organising institution:
Karpos
Country:
Greece
Age:
11-17
Key question:
How can I hide information and create a campaign?
Objectives:
To use technology (in this case qr codes) creatively, to learn how to combine different media, to combine different aspects of reality (digital and analogue), to experiment with visual communication using elements of surprise, to create an engaging campagne on a specific topic.
Time:
6 hours
Software and apps to be used:
Qr-code-generator, qr code reader app, piktochart.com, logomakr.com, dropbox.com, freesound.org, soundbible.com, clyp app, audacity (optional), mentimeter (optional), post-it app (optional).
Brief presentation:
The students get to know and experiment with qr codes. Then, in teams they create content on a specific theme using video, image, sound and text and they generate their own qr codes in order to ‘hide’ their content. Finally, they use their qr codes they generated in order to combine them with other visual elements in order to create an engaging poster. All the teams’ posters constitute a campaign on the specific subject. The basis of this activity is the gamification of learning. Students are being engaged in hiding and seeking/revealing information using qr codes. They have to collaborate, to think creatively, to test and evaluate, to present their work and create engagement.
Topics covered:
Can be applied to any topic of the school curriculum.
Civic engagement:
We start from personal interest and create a ‘campaign’ for others to understand and engage. The campagne can be presented at school, in the school’s neighbourhood or in a specific area of the city.
Preparation of space for the Atelier:
The space needs to have internet access, large tables for working in teams, one laptop/computer per team, a projector (optional). The participants can use either their own mobile phones or tablets. If the students use their own mobile phones, they should have downloaded all the apps before the start of the atelier. Furthermore, the mobile phones that are going to be used should upload all material throughout the atelier straight to dropbox instead of downloading them to the computers (as sometimes there are problems of incompatibility).
Materials needed:
Printed qr codes, coloured marker pens, white sheets of paper.
Main inspirations taken from personal research:
- The different ways of decrypting-revealing information, for example mors code, rfid, bar code, binary etc.
- The work developed by the SixMemos collective on QR codes inspired by the work of Bruno Munari.
Mass media and social media connections:
Qr art, 3d qr codes, qr codes used in galleries and museums as well as in magazines and other products. Interesting examples of Qr Code Art can be found on: https://designerqrcodes.wordpress.com/
How do you plan to give voice to students to present or show their personal skills and knowledge?
As an introduction to the atelier students should fill the ‘What you don’t know about me’. This can be used by the teacher to learn about his/her students’ skills and maybe separate them accordingly into teams. Also, brainstorming in teams (optionally using post-it notes or the post-it app). In the second phase the teams can be split in smaller groups, thus giving space to quitter students to express.
How do you collect information as the starting point of a Digital Atelier?
The students fill in the ‘What you don’t know about me sheet’.
Introducing students to the key question - the research begings:
How can I creatively use the qr codes in class? (What is a qr code? How is it used? What instruments can I use to decode it? What sort of information can I hide in it?)
Experimental phase
- Action that unfolds the practical activity to clarify the question: In this session the students are introduced to the topic that the teacher chose to investigate via the QR codes atelier. This can be any subject of the curriculum (for example: gravity). The teacher introduces the selected topic with an intriguing question (for example: Star Wars' Obi-Wan Kenobi said the Force “surrounds us and penetrates us; it binds the galaxy together.” What could he be talking about?). The answer to the question (i.e. gravity) is handed to them in the form of a qr code. They somehow need to see if the answer they have in their mind is the correct one. How can I reveal the information? Introduction to qr reader apps.
- Active work of the students: How does a qr code work and what sort of information can I hide in it? The students are given an A4 sheet with several qr codes in different sizes and colours. The teacher can choose to either use the prepared qr code sheet (see appendix) or prepare one with content related to his/her topic. The students try to reveal the hidden information using their phones (or school tablets). The basic principal here is to experiment with the qr technology. How small can the qr code be in order to be readable from devices? Is any colour readable? At the same time, the students discover the type of media that can be hidden in a qr code: sound, image, text, video. Then they use markers to draw on the codes. How much can I transform the code for the information to be still readable? The answers they get from the above experimentation will help the students find a creative way of using the qr codes in the final stage of the atelier (while creating their posters).
- Presentation of findings and results (visualisation of information): Presentation of results, discussion in class.
- Analysis of results: The teacher presents the diagram (see appendix) of how information is hidden in a qr code.
Project/design phase - part 1
Second action that unfolds the practical activity:
Can I create my own qr codes?
Active work of the students:
- The topic of the research is now expanding to more complex directions (for example: the apple in Newton’s eye led to the first inverse square law in science, F = G * (mM)/r2. What does this mean?).
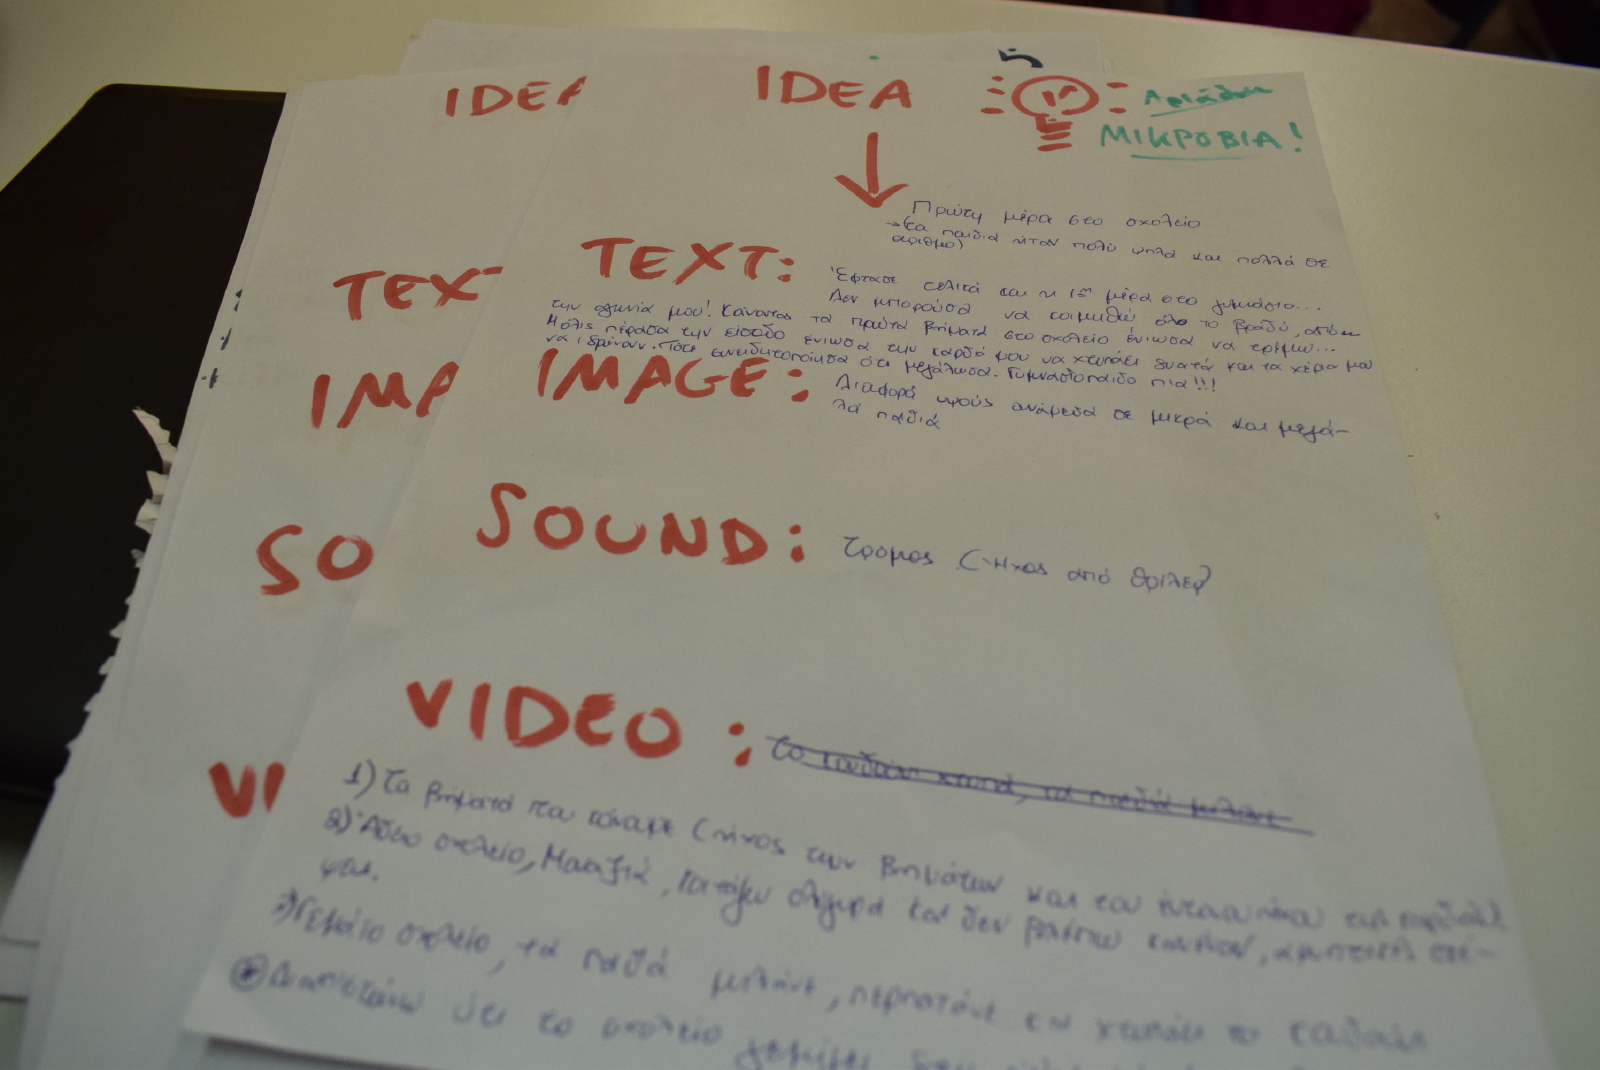
- The students split up in teams and they research the topic. Their task is to create content related to the topic using 4 different media: text, sound, image and video.
- The teams can research and brainstorm (optionally using post-it notes or the post-it app). In the end of this session they have to make a decision on the most relevant/engaging/interesting information that their qr code should contain and the form of media. What is the most important/interesting thing to focus on and which media (sound, an image, a video or a text) will be the best way to express it?
- The students create content using their phones (school tablets or cameras and videocameras).
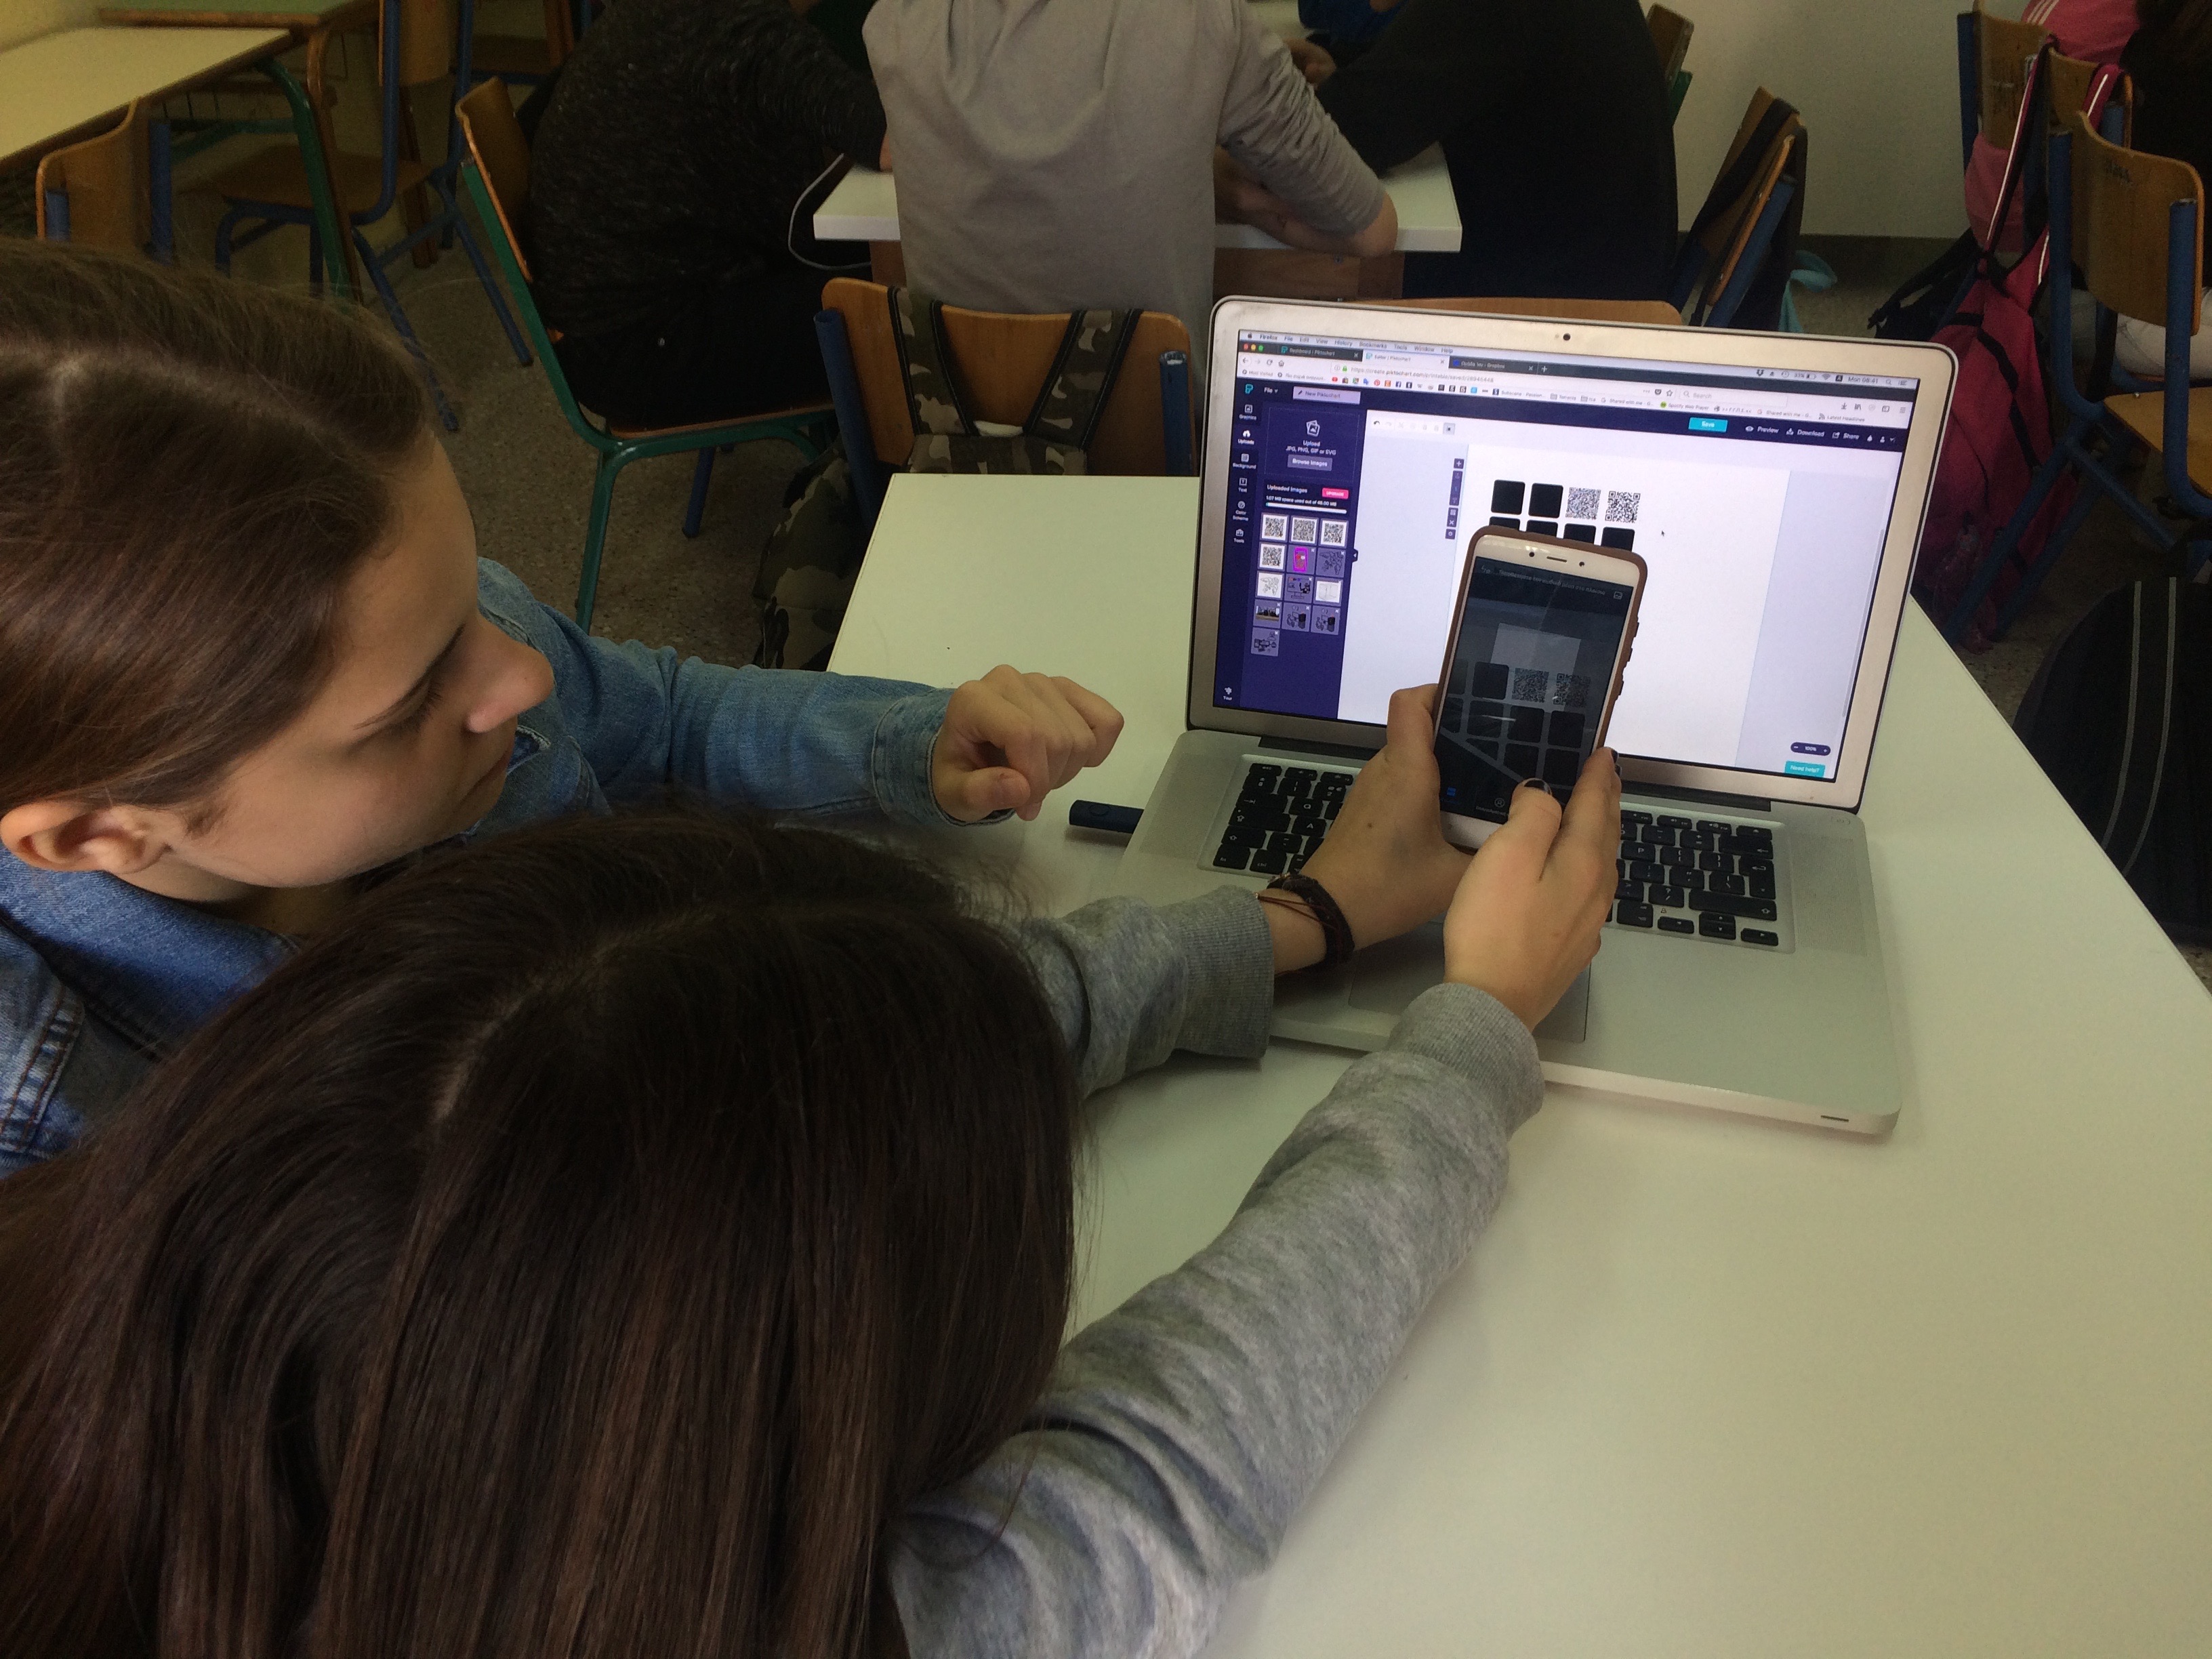
- When the contenti is ready they hide it by generating their own codes through an online platform, for example http://www.qr-code-generator.com//. (This part can be set as homework if there are no available computers at school and/or to reduce time)
Tips:
- Sounds can be either constructed or found on the internet (freesounds.org, soundbible.com). If there are students with sound editing skills they can edit their sounds in a sound editing software such as audacity.
- For creating videos: unless there are students that are experienced in making videos, we suggest a camera adjusted on a tripod shooting from a single angle and creating a video of 20sec (we generally suggest a max video length of 30sec).
- The best way is to upload all material on a shared dropbox folder and create the qr codes using the dropbox’s urls. Another flexible app for recording and instantly uploading sounds is the clyp app.
For checking compatible formats for dropbox go to: https://www.dropbox.com/help/files-folders/file-types-that-preview
Presentation of findings and results (visualisation of information):
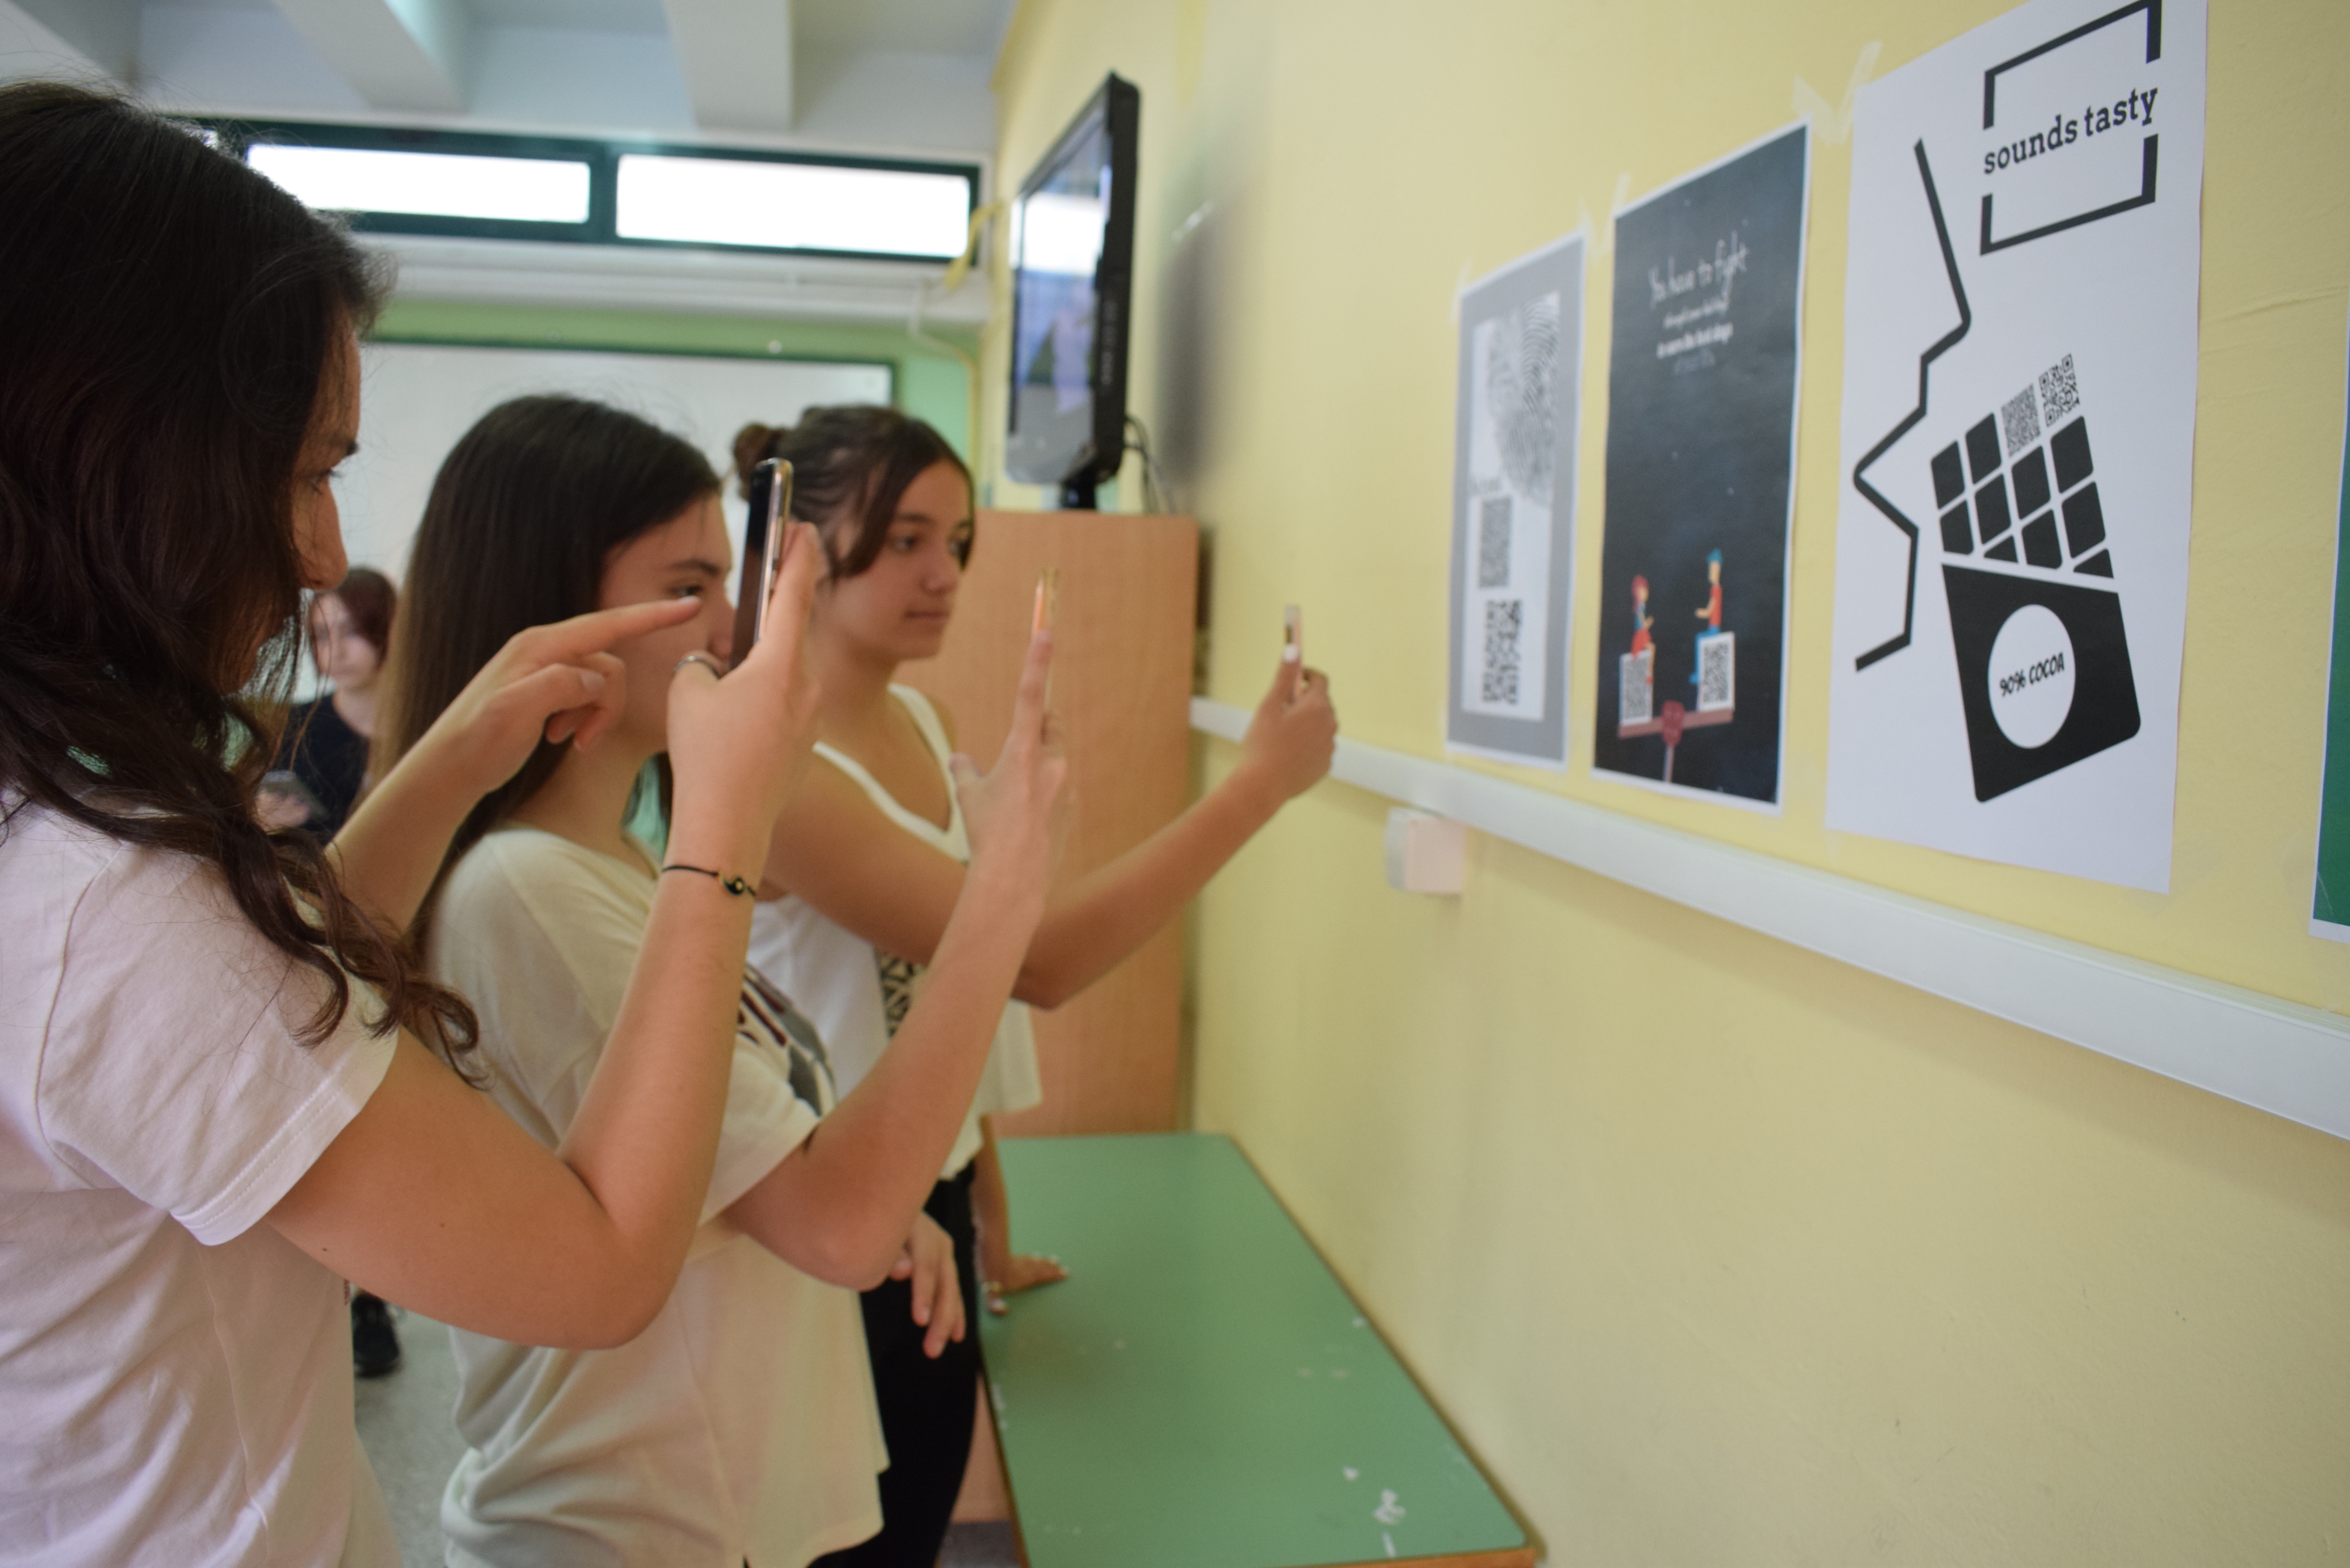
The students print out their qr codes and put them on display one next to another. They explore eachother’s work using their phones or tablets. Alternatively the qr codes can be displayed on each team’s screen and the students can go around and test eachothers qr codes.
Optional: Evaluation using mentimeter: How much to the point was the hidden information? Did it make the best use of the format (sound, text, image, video) How helpful was it to understand the topic? Was the hidden message interesting/ teasing? What criteria for selection did I use? etc.
Analysis of results:
All qr codes look the same, but the message they contain is completely different.
Project/design phase - part 2
Third action that unfolds the practical activity:
Can I use qr codes in order to create an engaging visual communication? How can I create a campaign in the school on a specific topic, (for example: the importance of gravity) combining visual information and qr codes? How can I use qr codes to enrich a visual message?
Further questions: How can I create engagement to a specific topic? How can I learn/teach others in a playful way? How can I combine the analogue with the digital world? What makes a poster successful? What elements should it have?
Active work of the students:
Each team has to create a poster that combines symbols and words with qr codes containing sound, video, images and text, thus analogue information with digital. The students will try to use some of the qr codes that they created in the previous stage in a playful and engaging way. All posters will be part of the class’ champaign on the specific topic.
- Concept Brainstorming of ideas on how to present the information. How can the qr codes be used in order to engage?
- Visual Language The students research on the elements and visual language in creating a poster. What elements are important? What size?
- Experimenting with Synthesis Depending on the teacher, this can be made in an analogue or digital way:
- Digital: They combine the above in an image editing software, such as piktochart.com, in order to make a digital version of their poster.
- Analogue: The students print out different sizes of their qr codes. They research on the internet and they print out black and white symbols, silhouettes and letters that help them visually express their ideas. Also using black markers, they make different combinations on an A3 paper in order to come up with their final proposal. Then the photocopy it to make their proposal of a poster.
Tips:
- The qr codes have a strong ‘graphic’ aesthetic, thus when used in posters they are better combined with symbols rather than photographs or other images. The students can find ready made symbols on the internet, in the piktochart.com platform or create their own in logomakr.com.
- From the first stage of the atelier the students have drawn the conclusion that the qr codes work even if they are partly covered or when they have several colours. They can invest on these observations, overlap symbols and qr codes, change their colour, etc in order to create a more interesting result, deferring from their usual square shape.
- Students must choose the qr code(s) with the most relevant content-media that will best complement their poster.
Presentation of findings and results (visualisation of information):
Engage with eachother’s posters. This is a good opportunity for civic engagement: Place the posters around the school or neighbourhood/ organize an exhibition.
Analysis of results:
Discussion and reflection. Optional: Evaluation through mentimeter:
- Which poster did you like the most?
- Which one was the most engaging?
- Which one used the qr codes in the most creative way?
- Which poster had the most interesting information?
Approach to a new software or a new app:
The students try out and experiment with the apps themselves.
Links between the Digital Atelier and real life of the students:
The students have seen qr codes in several products, but most times the codes are used in exactly the same way and they are linked to a website. Via this atelier the students take an existing technology, experiment with it and end up using it in a more creative way.
How do you plan to evaluate knowledge and skills?
By the actual end result (production of posters).
Conclusion:
Following the stages of this atelier the students research in a playful way, they can have a holistic view of different subject areas or even visualise and better understand more difficult aspects of their school curriculum or local issues, while they try to engage other students, too.
The publication was created as part of the project: APP YOUR SCHOOL.
This publication reflects the views only of the author, and the Commission cannot be held responsible for any use which may be made of the information contained therein.